

Woodworking is perhaps one of the most calming and therapeutic hobbies one can take up.
It’s a great way to spend some time alone, or with friends, while also creating something beautiful (or at least functional).
And, it’s a skill that you can use for the rest of your life. But can you learn it by yourself?
Yes, you can absolutely self-teach woodworking! And the best way to do that is by diving headfirst into a beginner’s project. Here are the 6 steps to follow – find a suitable project, create a plan, gather the tools & materials, start cutting & shaping, put it all together, and complete the final touches.
In this guide, we’ll show you how to self-teach woodworking through each of these steps.
And as you’re working on your project, you’ll gain more and more experience and confidence in your abilities.
And before you know it, you’ll be a woodworking pro!
So, let’s not waste any time and start creating something beautiful!
5 Steps to Self-Teach Woodworking
As we’ve mentioned before, the best way to learn woodworking is by actually doing it.
So, let’s take a closer look at each of the steps involved in self-teaching woodworking.
-> Read Also What Is An Autodidact?
1. Find a Suitable Project

The first step is to find a project that you’re interested in and excited about. Pick a project that you’ll actually use or display proudly.
It doesn’t have to be perfect, but it should be functional and/or look good.
This is probably the most important step because if you’re not excited about your project, you won’t finish it (and learning is all about the journey, not the destination).
So, take some time to browse through woodworking plans and find a project that you think you can handle. And don’t be afraid to try something new or challenging!
Here are some simple woodworking ideas: Bookcase, Desk, Dresser, End Table, Coffee Table, Dining Chair, Birdhouse, etc.
2. Create a Plan
Once you’ve selected a project, it’s time to create a plan. This will be your roadmap for the entire project. And while it may seem confusing at first, making a plan is actually quite simple.
Start by searching for some woodworking plans for your project. These can be found online or in woodworking magazines.
Once you have your plans, take some time to study them and understand all of the steps involved.
And if you’re feeling really ambitious, you can even create your own woodworking plans!
Just be sure to include all of the necessary steps and measurements.
Take a look at the resources below to find the perfect plan for your project:
3. Gather the Tools & Materials

Now that you have a plan, it’s time to gather all of the tools and materials you’ll need for your project.
Start by making a list of all of the tools and materials you’ll need. Then, start collecting them little by little.
You don’t need to buy everything all at once – you can often find used tools and materials for cheaper.
In terms of material, the only one you’d probably need to buy is wood (of different shapes and sizes). And you can find that at your local hardware store.
Just be sure to select the right type of wood for your project!
As for the tools, take a look at the table below for the most basic tools everyone will need to learn woodworking:
| Tools | Description | Beginner Friendly Recommendations |
| Chisel | A chisel is a hand tool used to remove small pieces of wood. It’s also used to make grooves, channels, or other indentations in the wood. | – Narex Boxed Bench Chisel Set – Irwin Marples Blue Chip Bench Chisel Set |
| Circular Saw | A power tool with a rapidly rotating toothed disc, used to make long, straight cuts in wood. | – Makita 5007Mg Magnesium 7-1/4-Inch Circular Saw – DeWalt DWE575SB 7-1/4-Inch Circular Saw with Electric Brake |
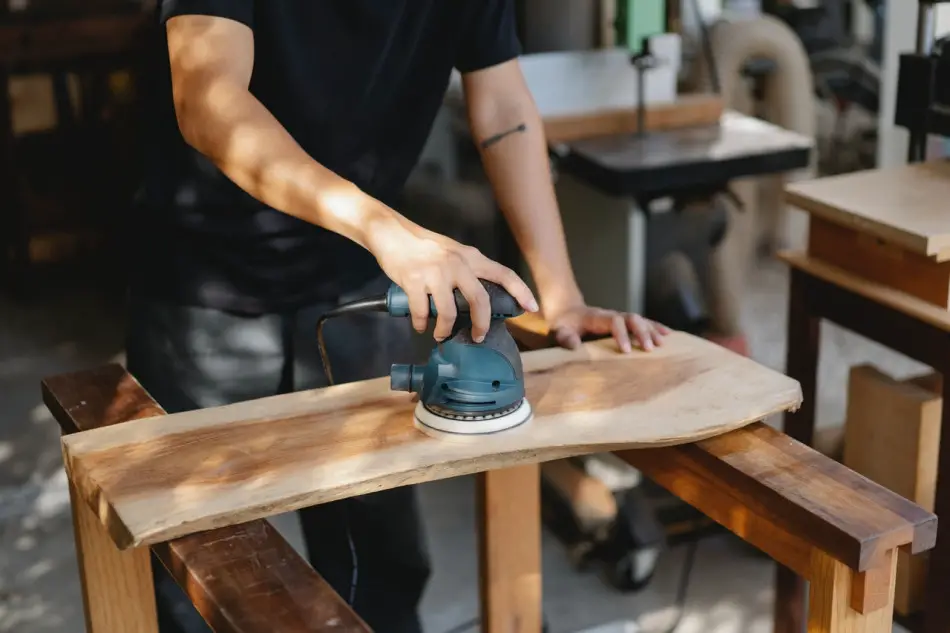
| Electric Sander | Used to smooth and finish wood surfaces by sanding them with a rotating belt of abrasive cloth/paper. | – Makita Random Orbital Sander – DeWalt DWE6411 Sheet Sander |
| Hammer | Used to drive nails or other fasteners into wood. | – Estwing 16-Ounce Steel Claw Hammer – Stalwart 16-Ounce Natural Hardwood Claw Hammer |
| Hand Saw | A saw with a blade held in the hand, used to manually make long, straight cuts in wood. Less powerful than a circular saw, but also very cheap. | – IRWIN Tools Universal Hand Saw – Stanley 20-045 Fat Max Hand Saw |
| Layout Square | A tool used to mark out or check right angles. It can also be used as a ruler. Since most woodworking projects involve right angles, this is an essential tool. | – Swanson Tool Company Speed Square Pack – WorkPro Combination Woodworking Square |
| Nails | Used to join two pieces of wood together. Find a nail set, which contains different sizes of nails, at your local hardware store. You’ll need a ton of these. | Best to check with your local hardware store. |
| Power Drill | Used to make holes in wood. It can also be used to drive screws. | – DeWalt 20V Max DCD791D2 – SKIL PWRCore 20 Brushless HD529402 |
| Safety Gear | Goggles, gloves, and a dust mask are essential for protecting your eyes, hands, and lungs while woodworking. | Check with your local hardware store. |
| Screwdrivers | Used to drive screws into wood. You’ll need both a Phillips head and a flat head screwdriver. | – Craftsman 17-Piece Screwdriver Set – Klein Tools 11-in-1 Screwdriver and Nut Driver |
| Tape Measure | Used to measure distances, lengths, or thicknesses. An essential tool for any woodworking project! | Any accurate tape measure will do. |
| Utility Knife | Used to make small, precise cuts in wood. It can also be used to score lines or make other markings on the wood. | – Milwaukee 48-22-1502 Fastback Utility Knife – Lenox LX250 Utility Knife/Screwdriver |
Once you’ve gathered all the necessary tools and materials, you’re ready to start working on your project!
4. Start Cutting and Shaping
Now it’s time to start working on your project! This is where the fun really begins.
Start by cutting the pieces of wood according to your plan. Then, begin carving them into the desired shape, making sure the measurements are correct.
Be sure to take your time and work slowly and carefully.
Since you’re in the learning phase, you’re bound to make some mistakes. And that’s perfectly okay!
Just be sure to learn from your mistakes and use them to improve your skills.
Remember, the goal is to enjoy the process and create something you’re proud of – not to perfection.
Here’s a video that gives you a couple of tips and tricks to keep in mind while marking and cutting wood:
Key Takeaways:
- Use sharp pencils to mark your wood, as these give more accurate measurements. You can further fine-tune the mark with a utility knife.
- Make V-shape marks (also called a crow’s foot) instead of dashes. The point of the crow’s foot is where the mark is.
- Always keep your line of sight in line with the cut path of the saw.
- When using pencils to make marks before cutting, split the mark again down the middle and cut through the center of the mark for more precise cuts.
- If you’re in a hurry, you can make an indentation in the wood with your saw tooth itself instead of a pencil. This saves a ton of time in the long run.
5. Put It All Together
Once you’ve cut and shaped all the pieces of wood, it’s time to put them all together!
Start by referring to your plan to see how everything should fit together. Then, begin assembling your project piece by piece. Be sure to use the right type of glue or nails for each part.
If you’re not sure how something should go together, don’t be afraid to ask for help or look up a tutorial.
The resources we’ve mentioned above for the woodworking plans have step-by-step instructions that are easy to follow.
And once you’re done, take a step back and admire your work! Yes, you’ve just built something completely from scratch – congratulations!
However, there are a few last things you need to do before your learning project is truly done.
6. Complete the Final Touches

The final touches are what will really make your project shine. Here they are:
- Sanding: This step is important as it will give your project a smooth and polished finish. Be sure to sand in the direction of the grain.
- Staining/Painting: If you want, you can add a stain or paint to your project. This is completely up to you and what you think looks best. Just be sure to use a non-toxic option.
- Sealing: To protect your project, you’ll want to seal it with a layer of varnish, lacquer, or oil. This will also give it a nice sheen.
You can also make one final sweep with a damp cloth to remove any sawdust or dirt.
And that’s it! Your project is now complete. And through attempting your first woodworking project, you’ve learned a whole host of new skills.
Don’t stop there though! Keep practicing and learning so you can perfect your craft.
Soon enough, you’ll be able to create any type of woodworking project you can dream up.
-> Learn More about Self-Learning vs. Classroom Learning: Which Is Better?
Tips to Make Woodworking Easy to Self-Teach
Most people who want to learn woodworking are either intimidated by the task or think that it will be too expensive to get started.
Here are some tips to make woodworking easy to self-teach:
- Get comfortable with the tools: If you’ve never held a hammer or saw before, you’re going to be pretty lost when it comes time to start your project. Get comfortable with the tools by practicing on some scrap wood first.
- Start small: Once you’re comfortable with the tools, start with a small project like a birdhouse or a simple end table. These will help you get familiar with the construction process without feeling overwhelmed.
- Always pick out straight wood: Crooked or bent boards will make your project look sloppy, and make the learning process significantly harder. So be sure to only select straight pieces of wood. You can check for straightness by sighting down the length of the board.
- Measure twice, cut once: This is a famous woodworking saying for a reason. It’s very easy to make mistakes when measuring and cutting wood, so it’s important to take your time and double-check your work.
- Safety first: Even the most experienced woodworkers can have accidents. So be sure to always wear safety glasses and follow all safety precautions when using power tools. And keep your work area well-ventilated to avoid inhaling sawdust.
- Try to get an apprenticeship: Once you’ve learned the basics of woodworking, try to get an apprenticeship with a local carpenter or woodworker. This will help you learn even more about the trade and gain some real-world experience.
Frequently Asked Questions (FAQs)
Here are some of the most frequently asked questions about woodworking:
Q.1. What type of wood should I use as a beginner?
A. Some of the best beginner-friendly woods are pine, maple, beech, and white oak. They’re easy to work with and won’t damage your tools.
Of these, pine is the most affordable, so give that a shot for your first project.
Q.2. How long does it take to learn woodworking?
A. It really depends on how much time you’re willing to dedicate to learning.
If you practice regularly, you could be proficient in 5-6 months. However, it takes most people years to truly master the craft.
Q.3. What are some good resources to self-teach woodworking?
A. Since woodworking is a highly technical skill, it’s always better to learn it by watching than by reading.
There are tons of YouTube channels out there dedicated to woodworking, so start there.
Some of them are – Woodworking For Mere Mortals, The Wood Whisperer, and Garage Woodworks.
-> Learn more about the 7 best websites for self-learning
Final Thoughts
We hope this article has inspired you to try your hand at woodworking.
It’s a challenging skill to self-teach for sure, but the happiness you’ll feel when you finish your first project is priceless.
So go out there, get your hands dirty, and make something beautiful.
Good luck!